
This process started with a design for a ring to mount the LED module to and a corresponding clip that would be part of a lampshade that the ring with mounted LED would clip into. The 3D designs were done in a combination of 123D Design and Tinkercad.
The ring/clip combination took a considerable time to develop, given the heat generating capabilities of the LED module and the low melting point of 3D printed plastic, especially PLA. A number of designs were developed and tested that minimized the contact between the module and the 3D printed ring, provided protection from fingers touching the back of the hot modules, provided ample air flow, yet minimized size and offered ease of installation.
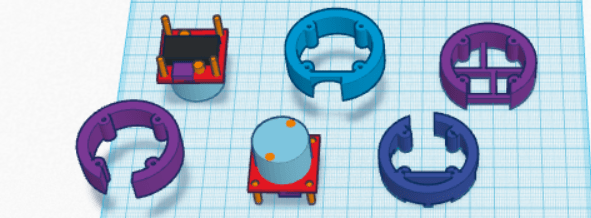
Once the ring was finalized the basic clip could be created by subtracting a ring from a cylindrical blank in 3D space. However the notion of using tabs that would flex on the clip as the ring was inserted created a lot of difficulty when using brittle filaments like PLA–the tabs tended to break if the fit was too tight. A large number of tiny revisions of the slots for the tabs on the ring were required to achieve the best compromise of good fit with minimal risk of breakage.
Thanks to my membership in multiple makerspaces I was able to test these designs in both ABS (good) and PLA (acceptable) on a wide variety of 3D printers. The primary work was done on a Stratasys uPrint SE using ABS but that was then tested on consumer-level printers from Makerbot, Makergear, Ultimaker, Deltamaker, and Printbot in PLA since most of us don’t own a $25,000 Stratasys. Ultimately small compromises were necessary throughout the 3D design to achieve acceptable fit on all parts of the lamp assembly across these printers.
I wanted to offer a variety of lamps that the ring with a LED module could clip into. I ultimately chose a desk or reading lamp, a decorative lamp shaped like a rocket, and a general utility lamp that would be the quickest and easiest to print. I am also making the ring and clip available on their own for people who would like to design the clip into their own shade.
The most problematic feature of developing the lamps was again finding the right compromise of fit among parts that would allow a firm fit without easy breakage, especially in the pivot points on the desk lamp and the utility light. Fancy adjustment plans involving sliding clips and ball sockets also had to be abandoned in favor of a simple hole-and-pin connectors . PLA is just not friendly to parts that have to flex! I hope a less brittle filament eventually becomes the standard for low end printers.
The desk lamp presented additional problems in achieving adequate height with a sufficiently stable base while keeping print time low.

Once the 3D designs were finalized and printed for product pictures, it was on to kitting and putting it out there in the world….