
Update 7/1/2017: I have stopped selling these. If you want to have your own PCBs made you are free to do so as long as you keep the tinkerfarm.net as the only website on the silkscreen. This includes for commercial use. The gerber files can be found here.
This is a project that developed from something I needed, ok something I wanted. It is a small prototyping board designed to use with microcontrollers like the Arduino Nano. For many of my projects I have used an Arduino Nano or Pro Mini paired with a small motor driver, transistors, resistors, etc. for inputs and motion. I have been using the prototyping boards from Protostack, which are quite nice, but not perfect for my needs. So as a first project in designing a circuit board I decided to design one for my self and have it manufactured.


This page will not take you through every single step, but will outline my experience for those who would like to try it.
If just want the boards I designed, I have made a batch available for purchase on Ebay.
Features:
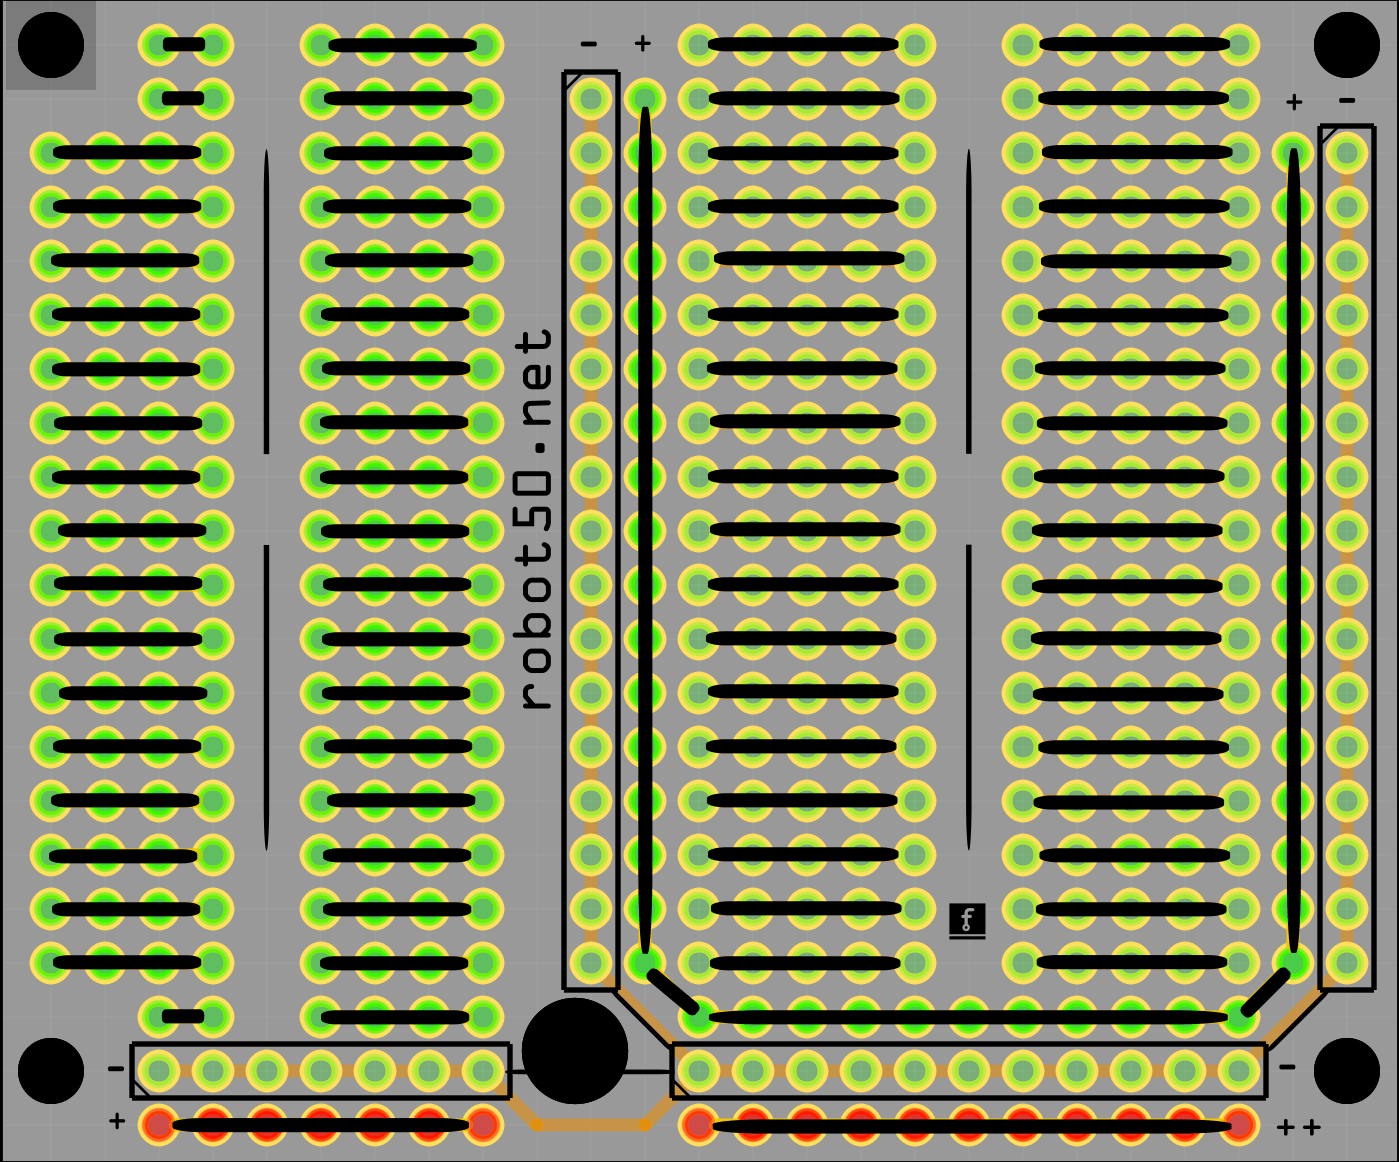
- 66mm x 55mm x 1.6mm overall size. Four 3.1mm mounting holes in the corners. An additional 5mm hole is provided to run wiring through the board (works great in tight mounting spaces).
- A total of 473 through-hole pads (plated on both sides to allow mounting from the bottom) in standard 0.1” (2.54mm) spacing. Holes are 1mm with .5mm ring thickness—they will handle components with wide leads.
- Set up for the micro on the right and supporting ICs and discrete components on the left. Of course it can be used without microcontrollers.
- Rows of pins are tied together as on breadboards. The top silkscreen shows the tied together rows.
- Ample power and ground rails, as indicated in the silkscreen. All grounds on the board are tied together. The power and ground rails around both sides of the micro area of the board are arranged for center positive standard servo cables (when headers are installed).
- The bottom of the board features two areas for power supplies—allowing multiple voltage regulators on board.
- This is a 2 layer board in 1 oz copper with a HASL lead free finish.

My Experience
There are many software tools for circuit board design. Eagle is one of the most popular and is often used by professionals. Frankly, I found it rather bewildering. Instead I started with 123D Circuits, a free online tool. 123D Circuits is interesting because for a few standard components you can actually simulate your circuit. I really just needed the PCB layout for my project. I did put together a draft of a prototype board in 123D Circuits, but it became rather unwieldy. Before giving up on that application I did submit a tiny sample board to have made up by them just to see how the process went. I received several copies of my useless little board for $7.

The experience of having a board made whetted my appetite for getting the prototype board done. I found that Fritzing, a free download, worked really well for a beginner like myself. Since I was doing a prototyping board I worked pretty much exclusively in the PCB tab of Fritzing. All circuit board design packages come with a parts catalog. Fritzing’s is well stocked with items from vendors commonly used by hobbyists, such as Arduino, Sparkfun, and Seeed.
Once I had the design laid out I ran it through Fritzing’s design rule checker before creating the Gerber files that would be needed for production. I also used a couple of online tools to view drafts of the Gerber files.
I found Particle’s Prototype 2 Production blog entries invaluable inspiration and education on preparing a circuit board design for manufacturing in China.
Once I thought I was ready I ordered 3 sample boards from OSH Park (for $28) as it was cheaper (and quicker in the US where I am) compared to Fritzing’s built in service. The boards arrived promptly and in good condition, and in OSH Park’s signature purple. I tested these out and gave out a couple for scrutiny.
After a couple of tweaks in Fritzing I was ready to take the plunge and have these manufactured in quantity. I ran the specs through PCBShopper to get some ballpark price quotes. That service does a nice job of compiling a table of quotes. However you have to select one of the manufacturers and enter your specs on their site to get a final quote for your project.
Ultimately I selected PCBWay to have 100 pieces of the prototyping board made up and shipped to me. I submitted my Gerber files prepared per Prototype 2 Production’s advice, paid up, and crossed my fingers. PCBWay was great. Although they bribe clients with discounts to write reviews, being able to view their work in detail from other clients before ordering was very reassuring. Their automated tools kept me up to date on every step of manufacturing my boards. My order arrived via DHL in 9 days from ordering. The quality of the boards is high and they were professionally packaged. The board were exactly to my design except that they inserted some sort of tiny batch number or something into the silk screen–not a problem.
This was a fairly evolutionary process, being my first time through. If I was starting over today I would design the board in Fritzing and send it off to PCBWay directly. But perhaps I am now ready to move up to Eagle or one of it’s competitors for the next board project.